We have already blogged that how we can create a bootable DVD of Windows Vista and  Windows 7 using WAIK(Windows Automated Installation Kit) as Microsoft does. WAIK is specifically targeted to Windows Vista and Windows 7 and nobody likes to download such a big Toolkit to create just a bootable DVD.

Today we have come with a simple and straight how-to guide, which explains how we can create bootable DVD of Windows Vista/7 using Nero burning software.

(We are using Nero because it is one of the popular CD/DVD burning software and can be available easily. You can grab the Trial version of Nero official website.)

Requires:

  • Windows Vista/Windows 7 Installation Source Files
  • Blank DVD and Nero.

How To:

  1. First of all, install Nero and prepare your Installation source files by copying them to particular folder or directory. Lets say- all files are copied to C:\DVD folder.
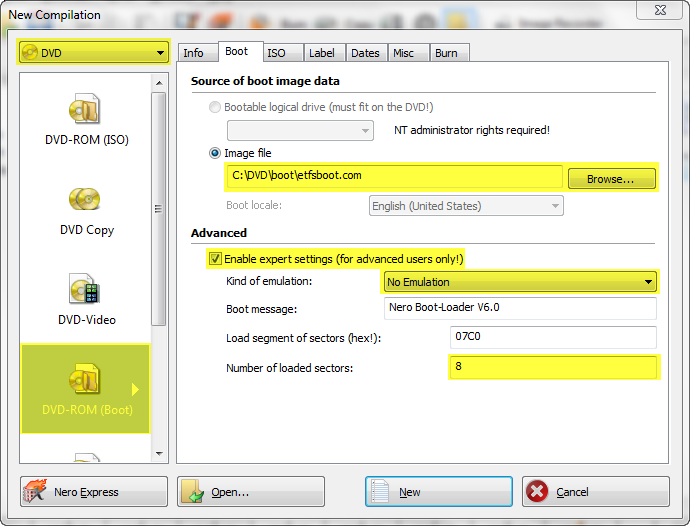
  2. Start Nero Burning ROM (Go to Start >> All Programs >> Nero >> Nero 9 and click on Nero Burning ROM). On New Compilation dialog box, Select DVD as compilation and then DVD-ROM (Boot).
  3. Step 1 - Nero New Compilation

  4. On Boot tab and locate boot image file using Browse button. (Windows Vista and Windows 7 installation source contain boot image file called etfsboot.com in Boot directory) See the above image.
  5. Windows Vista x64 Installation files doesn’t contain etfsboot.com, so you can use the same file from x86 version.
  6. Now under Advanced, check Enable expert settings (for advanced users only), set emulation type as No Emulation &  number of loaded sectors as 8 and leave rest of settings intact. (1 sector = 512Bytes, etfsboot.com requires 4.0KB to boot DVD)
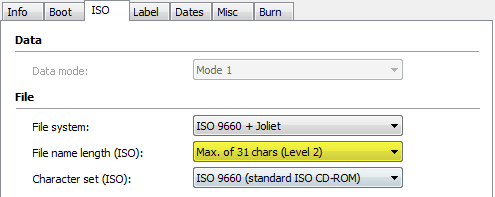
  7. On ISO tab, select File name length as Max. of 31 chars (Level 2). Now move Label tab and set the label of disc, say “Windows 7 DVD”.
  8. Step 2 - Nero ISO tab

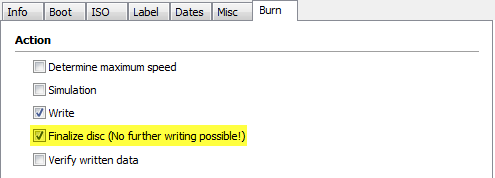
  9. On Burn tab, don’t forget to check Finalize the disc (No further writing possible!). Now almost everything is done, so click on New to add Windows 7 Installation Source files.
  10. Step 3 - Nero Burn tab

  11. Just select all files and folders from DVD and drag them under to Windows 7 DVD. That’s it, now click on Burn button on toolbar or choose Recorder menu >> Burn Compilation. Insert the blank DVD into drive and set appropriate burning speed. It is recommended to burn disc lower speed (2x or 2.4x) for better results.
Applies To:

  • Windows Vista (x86 & x64)
  • Windows 7 (x86 and x64)
  • Windows Server 2008 (x86 and x64)
  • Windows Server 2008 R2

94 responses to “How to Create Windows 7 Bootable DVD using Nero”

  1. NEERAJ Avatar
    NEERAJ

    It’s awesome man………….

  2. prabh Avatar
    prabh

    nero could not make bootable dvd of windows 7 or vista.it always say “install.wim is larger than 2 gb”.
    so,if you want to make a bootable dvd of windows 7 or vista use Imgburn
    it is free software.you need to download tutorial for making bootable dvd of windows 7 or vista using Imgburn!!!!!!!!!!!
    that’s it!!
    i tried it personaly!!!!!!!!!!!!

  3. Aditya Avatar
    Aditya

    Hello!
    Ramesh!!
    Every one is getting the same error mentioned above.
    Please give some help to get out of there. !!HURRY!!

    THANK YOU if you are solving the problem

    Your Blog Reader.

    1. David Cobb Avatar
      David Cobb

      The file “INSTALL.WIM” is larger than 2 GB and therefore cannot be stored in as ISO file system. Please use the UDF file system to write such large files. This can be done by selecting another compilation type.

      Please help…
      If you are getting the “2 GB Can Not Create ISO” error when creating an ISO DVD using Nero Burning ROM try using Nero Express instead. When you start Nero Express choose “Image, Project, Copy” from the menu on the left then choose “Disk Image of Saved Project” from the menu it goes to on the next page. This will create the Windows 7 installation boot disk with the files already decompressed on the DVD..
      Hope this helps … even though this is an old post..

  4. pawan kumar Avatar
    pawan kumar

    Hi,
    I am also getting the same error as Nikx. It says: “The file “INSTALL.WIM” is larger than 2 GB and therefore cannot be stored in as ISO file system. Please use the UDF file system to write such large files. This can be done by selecting another compilation type.”
    Please help!

    1. Dougie Avatar
      Dougie

      Have a look at the Imgburn instructions on page 2 of this thread it works perfectly.

      Good Luck

  5. sant Avatar
    sant

    the same problem i hav been facin as karan n johan r facing.
    i hav tried both iso and iso\udf procees to mak a bootable bt still does nt work at oll
    so, what is d main problems plz…. any1 thr to tell me abou diz problmz

  6. Meetpd Avatar
    Meetpd

    Hi,

    I am also getting the same error as Nikx. It says: “The file “INSTALL.WIM” is larger than 2 GB and therefore cannot be stored in as ISO file system. Please use the UDF file system to write such large files. This can be done by selecting another compilation type.”

    What should I do?

    Please help!

  7. Nikx Avatar
    Nikx

    Hi,

    I am getting the following error:

    The file “INSTALL.WIM” is larger than 2 GB and therefore cannot be stored in as ISO file system. Please use the UDF file system to write such large files. This can be done by selecting another compilation type.

    Please help…

  8. Nathz_ Avatar
    Nathz_

    tnx for the article its really work !!!^^

  9. Calinjovrea Avatar
    Calinjovrea

    tnkx>:D< i didnt knew how to do it without ya:X

  10. Kevin Nolan Avatar
    Kevin Nolan

    Windows Valley,
    Thanks for yet another great article and kudos to the team for putting this blog together!
    Kevin Nolan, Technologist/Developer

Leave a Reply

Your email address will not be published. Required fields are marked *