In this blogpost, we cover beginner to intermediate ways to create a bootable Windows USB flash drive using a Windows .iso file for installing or reinstalling Windows 11 and Windows 10 on UEFI-based computers. After walking through many methods, we have complied a list of top 4 techniques as follows:
- Use Rufus to create Windows 11 bootable USB flash drive
- Windows 11 bootable USB flash drive by using Windows Media Creation Tool
- Create bootable USB flash drive to use to deploy Windows 11 by using DiskPart (Command Prompt)
- Create Windows 11 bootable USB flash drive by using Windows Storage Management cmdlets (PowerShell)
Info
If you’re not sure about whether your existing computer is compatible to Windows 11 or not, refer to Windows 11 System Requirements.
To get started, make sure you have
- A computer running Windows 7 or later for Rufus and Media Creation Tool, and Windows 10 Version 1703 or later for DiskPart, and Windows Storage Management cmdlets with an internet connection
- An official Windows 11 ISO file from Microsoft’s Software Download site
- A blank USB flash drive. It needs to be at least 8 GB.
Tip
If you’re looking for the easiest way, use Rufus utility.
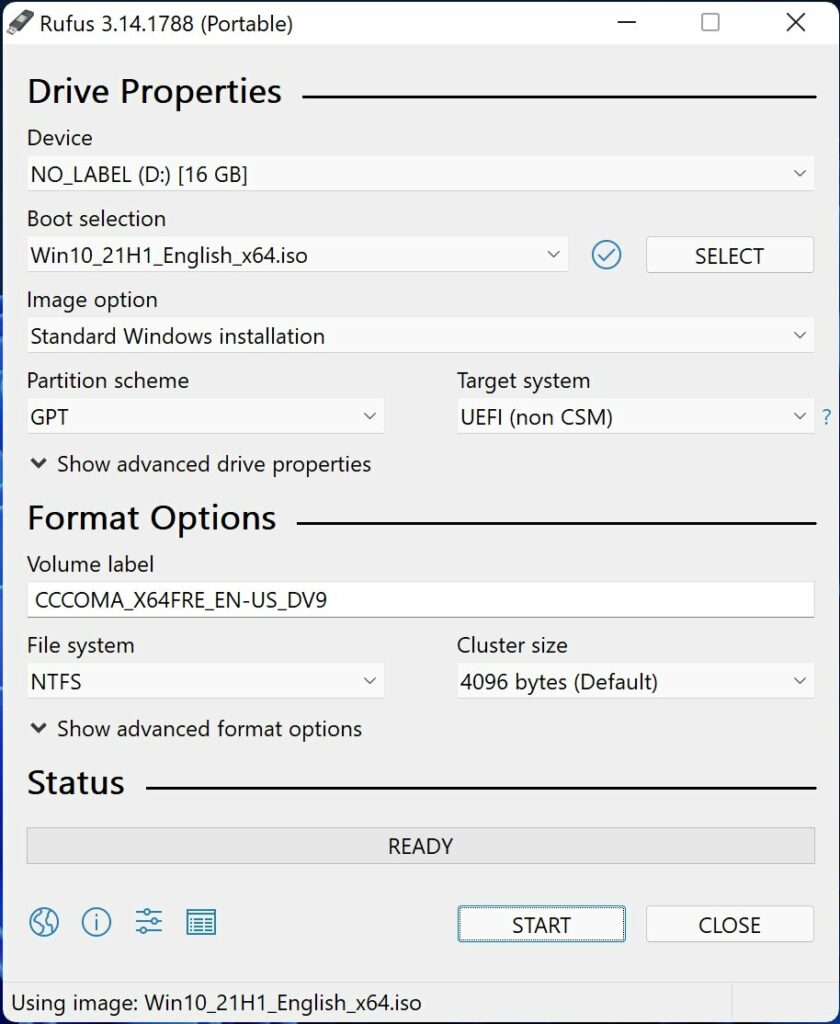
Use Rufus to create Windows 11 bootable USB flash drive
- Connect a USB stick to your computer.
- Download Rufus utility and Run it. The current logged in user account must be an administrator to run this tool.
- Now click on SELECT button to select the downloaded ISO file, and make sure the following options are set as follows:
- Image option: Standard Windows installation
- Partition scheme: GPT
- Target system: UEFI (non CSM)
- File system: NTFS
- Cluster size: 4096 bytes (Default), and keep rest of the options as they are.
- Now click on START button to kick of the process, the utlity will do the magic from partitioning and formatting the USB stick to extracting ISO file and copying its content.
- One it’s done, eject the USB stick and plug into the target system to boot and perform a clean installation or reinstall Windows.
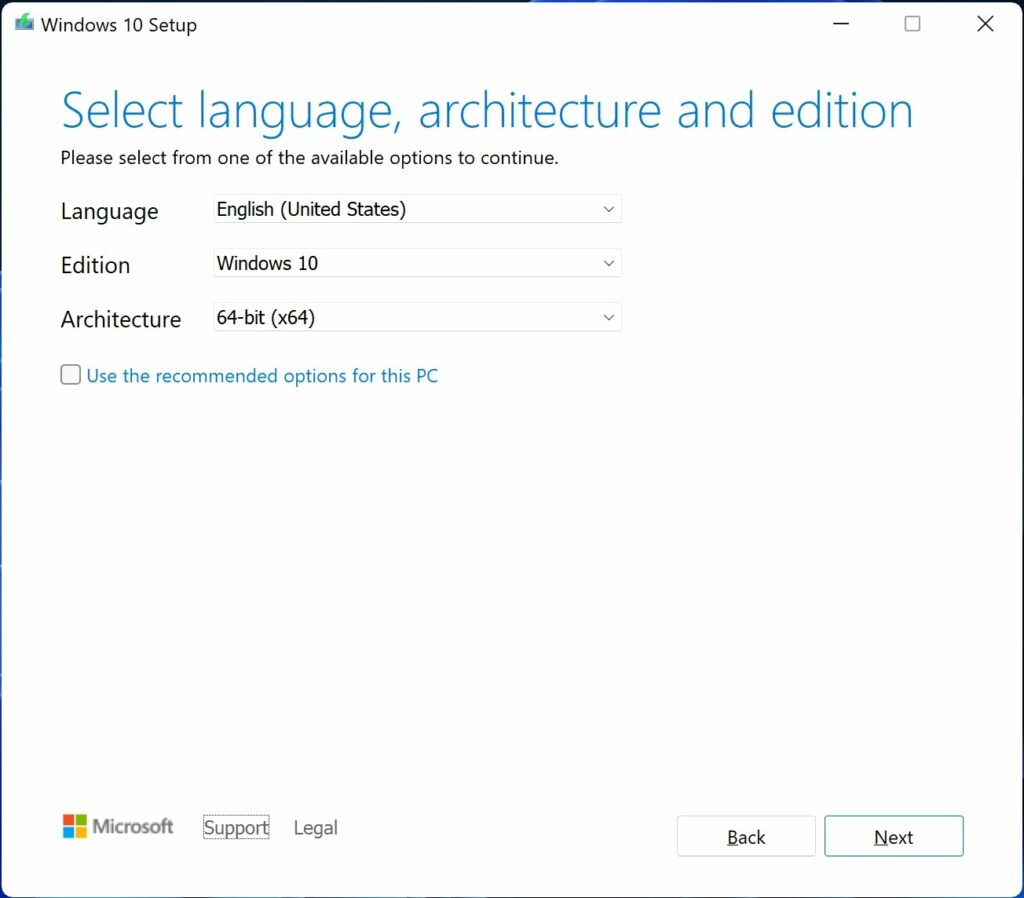
Use Windows Media Creation Tool
- Plug a USB flash drive into your computer’s USB port.
- Download Microsoft’s Windows Media Creation Tool and Run it. The current logged in user account must be an administrator to run this tool.
- Read the license terms and click Accept if you agree with.
- On the What do you want to do? window, select Create installation media (USB flash drive, DVD, or ISO file) for another PC and then click Next.
- On the Select language, architecture, and edition page, uncheck Use the recommended options for this PC to enable a plethora of choices to select language, edition, and architecture of Windows 11. Choose them accordingly and click Next.
- On the next page, choose USB flash drive to create bootable installation USB media and click Next. You can also choose ISO file and save a Windows 11 Disc Image that can be used to create bootable pen drive or DVD later.
- Now select your attached USB drive from the drives list and click Next to start downloading Windows 11 Setup files. Once the downloading is finished, the tool will start formatting the removable drive automatically and create a bootable Windows 11 USB flash drive.
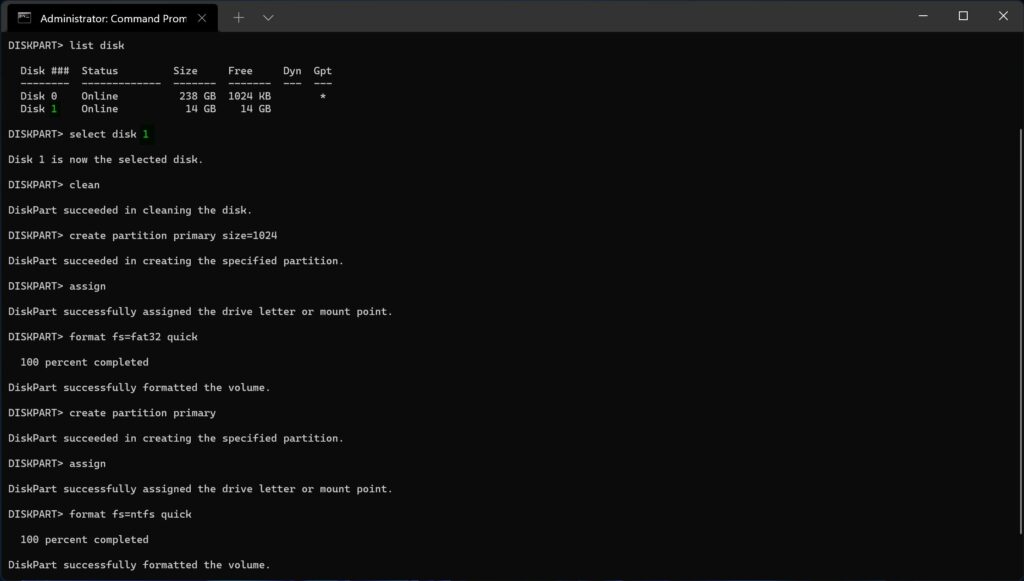
Create a bootable USB flash drive to use to deploy Windows 11 by using DiskPart (Command Prompt)
- Insert a USB flash drive into the computer.
- Open Command Prompt window as Administrator. (In the search box, type cmd and press Ctrl + Shift + Enter) and then type diskpart and press Enter to launch to DISKPART promopt.
- First, determine the USB flash drive index number, so run list disk command on the DISKPART prompt. The command displays a list of disks on the computer. Note the index number of the targeted flash drive.
- At the DISKPART prompt, now execute select disk x command (where x is the disk index number and in our case, it is 1) to receive the focus.
- After selecting the disk, run clean command to remove all partitions on the disk and then execute convert gpt command to convert the disk from MBR to GPT.
- To create the first primary partition on the USB flash drive, type create partition primary size=1024 or create part pri size=1024, and then press Enter. As soon as you create the partition, the focus automatically shifts to the new partition but it does not receive a drive letter. So, run assign command to assign a next available drive letter to the partition. Now type format fs=fat32 quick and press Enter to perform quick formatting the partition in FAT32 file format.
- Now create another primary partition using maximum unallocated storage space. To do so, type create partition primary or create part pri and then press Enter. Don’t forget to assign a drive letter to the partition as it doesn’t get one automatically. Then run format fs=ntfs and press Enter to format the recently created partition in NTFS file format.
- Once it’s finished, mount and browse the downloaded ISO file using File Explorer, and copy efi, boot, and sources (with boot.wim only) directories along with bootmgr and bootmgr.efi files to the FAT partition and copy reset of setup files the second partition i.e. NTFS (For more details, refer to the directory structure diagram) and your bootable Windows 11 USB stick is ready to roll.
Info
The modern (UEFI-based) computers boot to a system partition called EFI System Partition (ESP) that must be formatted using the FAT32 file format and FAT32 has a maximum file size of 4 GB. To workaround this situation and “The file ‘install.wim’ is too large for the destination file system.” error message, we create a 1 GB FAT32 partition to store the specified OS boot loader or kernel with some utilities and a NTFS partition for the rest of Setup files.
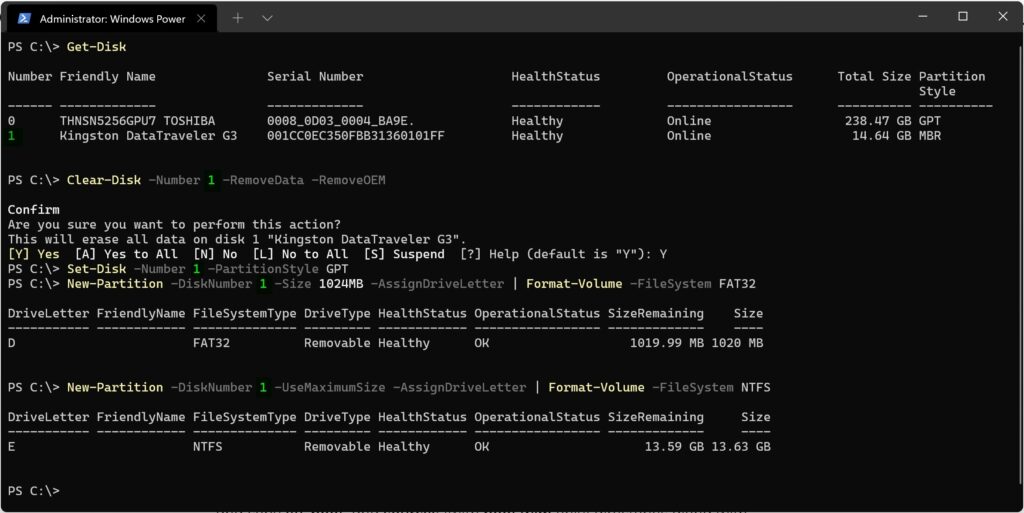
Create Windows 11 bootable USB flash drive by using Windows Storage Management cmdlets (PowerShell)
- Attach a blank USB flash drive to your PC.
- Open PowerShell window as Administrator. (In the search box, type powershell or pwsh and press Ctrl + Shift + Enter).
- First, determine the USB flash drive number, so run Get-Disk cmdlet that displays a list of physical disk objects on the computer. Note the disk number of the targeted USB flash drive.
- Now execute Clear-Disk -Number n -RemoveData -RemoveOEM (where n is the disk number and in our case, it is 1) to remove all data and OEM partitions on the USB flash drive.
- After erasing everything on the disk, type Set-Disk -Number n -PartitionStyle GPT to set the type of the partition as GPT.
- To create the first primary partition, assign a drive letter and format it in FAT32 file format, use this PowerShell one-liner with two cmdlets New-Partition -DiskNumber n -Size 1024MB -AssignDriveLetter | Format-Volume -FileSystem FAT32
- Now, create another primary partition with a drive letter using the maximum available space, and format in NTFS file format. To do so, use the one-liner New-Partition -DiskNumber 1 -UseMaximumSize -AssignDriveLetter | Format-Volume -FileSystem NTFS
- Once it’s done, mount and browse the downloaded ISO file using File Explorer, and copy efi, boot, and sources (with boot.wim only) directories along with bootmgr and bootmgr.efi files to the FAT partition and copy reset of setup files the second partition i.e. NTFS. This is it!
Directory structure diagram of UEFI bootable USB flash drive for Windows
FAT32 Partition/
??? boot
??? efi
??? sources/
?   ??? boot.wim
??? bootmgr
??? bootmgr.efi
NTFS Partition/
??? boot/
??? efi/
??? sources/
??? support/
??? autorun.inf
??? bootmgr
??? bootmgr.efi
??? setup.exe
Have you got any questions you’d like us to answer? If so, let us know in the comments.
Leave a Reply